
9 Tips to Conquer Revit & Enscape Material Editors
Enscape is an amazing tool that can generate gorgeous images from your Revit models in a few minutes.
But the biggest challenge is to create gorgeous materials while working with the limitations and quirkiness of Revit’s material editor.
In this post, you will learn everything you need to know to ensure a pleasant experience while preparing your materials. You will learn about crucial Revit material features you need to understand. Then, you will unleash the power of Enscape’s material editor & material library to simplify your workflows and generate beautiful images.
1- Understand the difference between Graphics & Appearance
In the properties of a Revit material, you will see multiple tabs. The important ones here are Graphics and Appearance. The Graphics settings are used for 2D and conceptual views.
For renderings and realistic views, you have to worry about the Appearance settings.
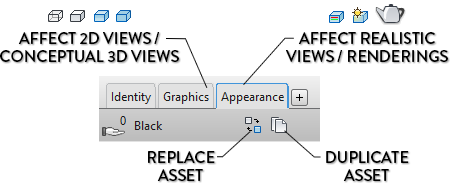
Here are the settings available in Graphics. You can set a color and a pattern, but you cannot adjust settings such as the texture images and reflection settings.

By looking at the Appearance menu, you will see familiar settings used for renderings.

2- Duplicate the appearance asset
A common mistake when managing materials is to duplicate a material, but not duplicating the appearance asset. The problem is that appearance assets can be shared among multiple materials. If you modify an appearance asset somewhere, other materials will be affected.
You know an appearance asset is shared among multiple materials by looking at the hand icon. In the image below, you can see number 3. That means there are three other materials using this appearance asset. You have to be careful if you modify this asset!

There are some things you can do to prevent mistakes. The first is to duplicate the appearance asset.

Once that is done, the number displayed should be 0. That means modifying this asset will not affect other materials.

3- In Revit 2023 or more recent: duplicate material and assets
If you are using an old version of Revit, you see the options below when you duplicate a material. There is only one way to duplicate, and it keeps the appearance asset shared with the original material.

Now, check out the same tool in Revit 2023 and more recent versions. You can Duplicate the Material and Assets. This way, you don’t have manually duplicate the asset after the material is duplicated.

4- Use Enscape’s Material Editor
Revit material editor is… let’s say… limited. It is slow and clunky to use. From a UX perspective, you cannot modify your Revit model while the menu is open.
Instead, let’s open Enscape Material Editor.

You will see a list of materials in your Revit project.

After selecting one of the materials, you will see a list of settings. These settings are different from what you see in Revit’s material editor.

5- Use Revit “GENERIC” Appearance Asset Only
For a material to show up in Enscape’s material editor, there is a setting you need to adjust. You must ensure the appearance type is Generic.
For example, here we have a brick wall material. The name of the material is RP-Dark Brick 2.

The appearance type is Masonry, which has specific settings in Revit’s appearance menu.

The problem is that when a type using an Appearance type such as Masonry, the material does not show up in Enscape’s material editor.
The solution is to replace the asset with a Generic type of asset. Click on this icon to replace the asset.

Make sure to pick an asset in the Generic category. Your best pick is the Default asset.

After replacing the asset, the material Dark Brick 2 is now available in the Enscape Material Editor.

6- Understand Enscape Material Editor
Now that the Revit material has been set up to appear in Enscape material editor, you can get going. Here is what you’ll see for a brick material:
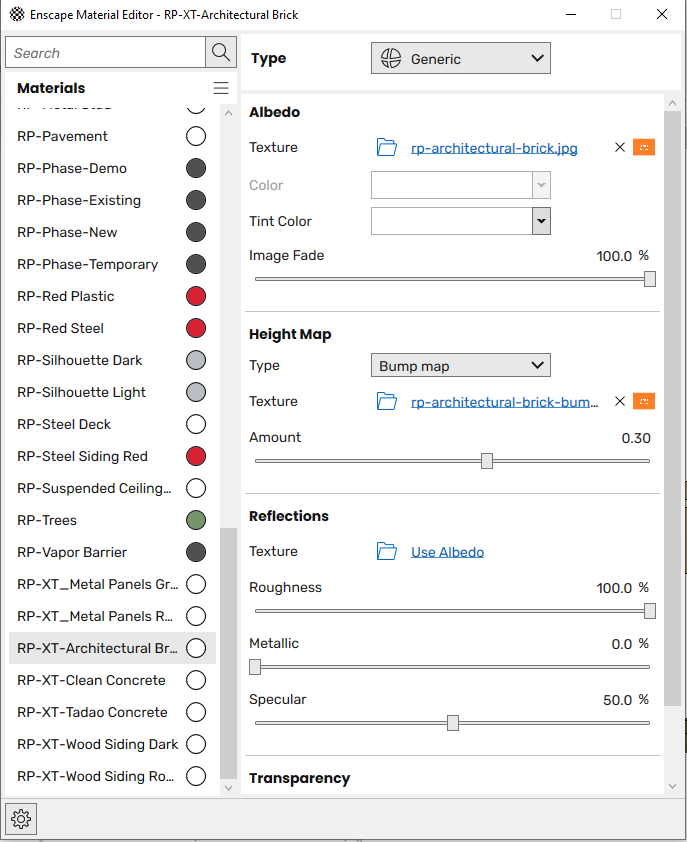
Above, you can see the settings in the Enscape. They show almost the same data as in the Revit editor, although Enscape has a much better UI. If you modify a parameter here, the actual Revit material will also be affected.
Some values are different. For example, Enscape has Roughness instead of Glossiness, which are the opposite of one another. Modifying the “Specular” reflection doesn’t affect the Direct and Oblique reflection in the Revit material.

There are a couple of great subtle features here. In native Revit, modifying each image map in material is slow and painful.
In Enscape, all maps can be easily accessed. Adjusting scales and angles can be done much more quickly. You can see an example below for a brick material. Also, you will get immediate feedback in Enscape instead of having to close down the whole Revit material editor each time.

7- Import Material Appearance From Enscape Library
Enscape includes a material library with a wide variety of high-quality materials.

You can import one of these materials in your project by clicking on Import Selection. However, there is a catch here. You should not replace your Revit materials with these Enscape materials. The reason is that you could lose important data. Also, the Enscape materials don’t have any surface and cut patterns applied.

No worries, though. There is still an easy way to use these great materials. In Enscape Material editor, click on the three small dots next to one of the materials. Click on Replace with Enscape Material.

Pick one of Enscape material. This will not completely replace the material, but only the appearance asset.

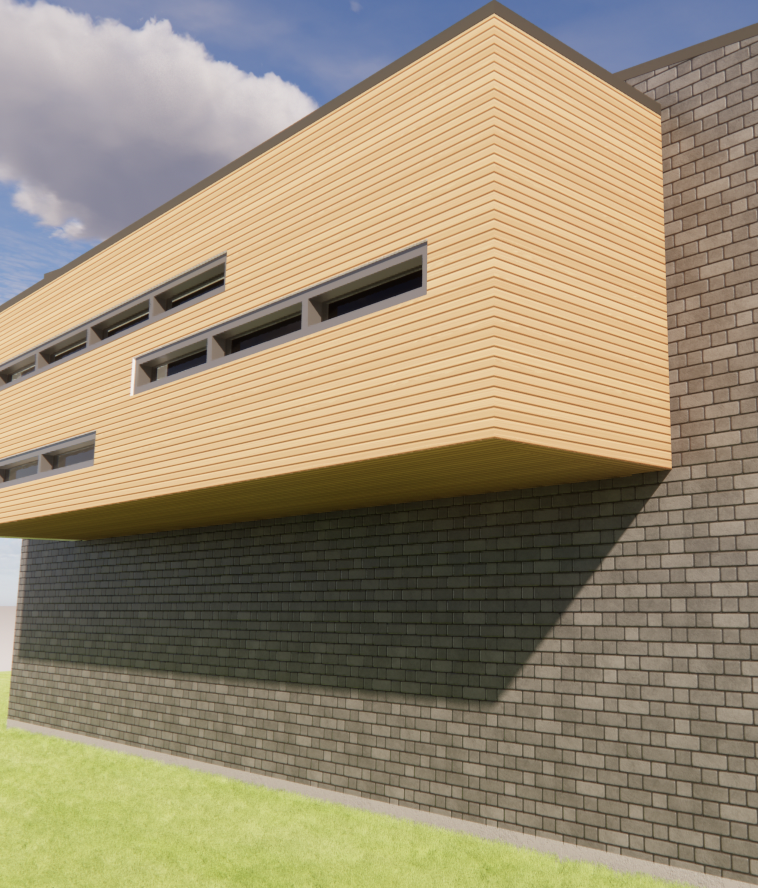
This way, you can use Enscape material whenever your Revit materials aren’t sufficient for the scene. For example, we’ve used Enscape’s wood and brick materials for this one:

8- Using PBR MATERIALS AND NORMAL MAPS
For the best possible rendering results, use PBR materials. PBR stands for “Physically Based Renderings”. You have no idea what these are? Check out this great Autodesk University talk by Josh Radle on this topic:
https://www.autodesk.com/autodesk-university/class/PBR-Materials-Revit-What-These-Materials-Mean-and-How-You-Can-Use-Them-2019
Here is the gist: these materials are more realistic, make better use of reflection, and allow you to use Normal Maps. They have been available since the Revit 2019 release. You can distinguish a material with an old, not-PBR asset by the yellow triangle next to the asset.

If you use one of Enscape’s appearance assets, it is irrelevant if this icon is displayed.
You might be familiar with a Bump map. This is typically a black-and-white image of the texture to indicate surface patterns.
WIth PBR materials, you can use a Normal Map instead. Sometimes, you will also see Displacement Map. This is typically a purple-looking image. Using a normal map will create much better result.
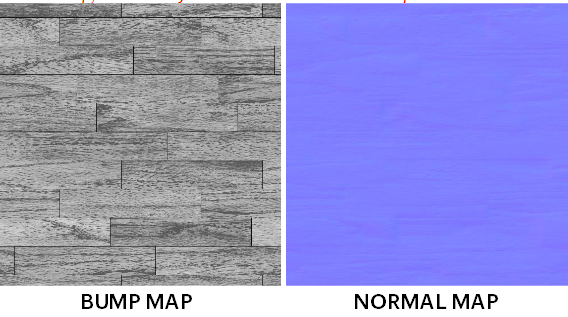
Here is the difference between an old Revit material and a PBR material. The PBR uses a “Normal Map”.

Typically, there is a tedious process to ensure you use a Normal Map in the Revit material editor. In Enscape, it’s quite simple. All Enscape materials are made with PBR & the best possible maps.
Here is an example of an Enscape brick material This one uses a Displacement Map.

9- Switch to Another Category in Enscape MAterial Editor
If you need grass, water, or another uncommon category, you can switch the type in the Enscape material editor.

You will see different options. In this example, you can adjust the height of the grass:

Recap: Follow All These Steps
Let’s recap. To properly master your materials, follow all these steps:
1- Assign suitable material to all Revit geometry.
2- Ensure that all materials have a unique appearance asset.
3- Ensure that all materials have a “Generic” type of appearance asset.
4- Open Enscape material editor.
5- Either assign an Enscape appearance to materials, or create a custom appearance.
6- Render and enjoy 😃
[add links, bio, etc]